Drawing robot legs can be a fun and creative challenge, requiring a combination of technical accuracy and artistic flair. Whether you're an aspiring artist, an engineer, or simply someone who loves robotics, mastering the basics of drawing robot legs can enhance your understanding and appreciation of robotic design. In this article, we'll explore five tips to help you improve your skills in drawing robot legs, from understanding the basics of robotic anatomy to adding details that make your drawings come alive.
Key Points
- Understand the robotic anatomy to draw more accurate and realistic robot legs.
- Use simple shapes to sketch the basic form of the robot leg before adding details.
- Consider the functionality and purpose of the robot leg when deciding on its design features.
- Pay attention to proportions to ensure your robot leg drawing looks balanced and realistic.
- Add details last, including textures, panels, and any movable parts that enhance the robot's functionality and appearance.
Understanding Robotic Anatomy

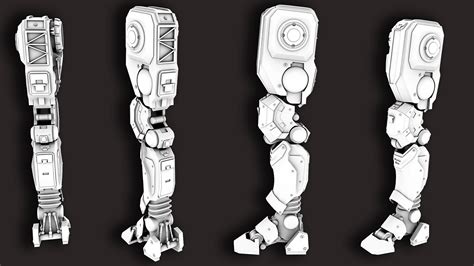
Before diving into drawing robot legs, it’s essential to have a basic understanding of robotic anatomy. Robot legs are designed to provide support, stability, and mobility. They typically consist of a combination of actuators (like motors or hydraulic cylinders), joints, and structural components. Understanding how these parts work together can help you draw more realistic and functional-looking robot legs. For instance, the number and type of joints can determine the range of motion and flexibility of the robot leg.
Breaking Down the Robot Leg into Simple Shapes
A useful technique for drawing robot legs, or any complex object, is to break it down into simpler shapes. Start by sketching the basic form of the leg using cylinders, boxes, and spheres. This approach helps you get the proportions right and ensures that your drawing is symmetrical and balanced. For example, the main body of the leg might be a cylinder, while the foot could be a box or a combination of simpler shapes. By starting with these basic forms, you can then add the details that make your robot leg unique and functional.
| Component | Description |
|---|---|
| Main Body | Cylinder or rectangular prism providing structural support |
| Joints | Spheres or hinge-like structures allowing for movement |
| Foot | Box, sphere, or complex shape designed for stability and traction |

Considering Functionality and Purpose

The design of a robot leg is heavily influenced by its intended use. For example, a robot designed for speed might have longer, thinner legs to maximize stride length, while a robot meant for heavy lifting might have shorter, thicker legs for stability. Thinking about the purpose and functionality of the robot can help guide your design decisions and make your drawings more believable and relevant to real-world applications.
Paying Attention to Proportions
Proportions are crucial when drawing robot legs. Ensuring that the different parts of the leg are in harmony with each other and with the rest of the robot’s body is key to creating a drawing that looks realistic and well-designed. Pay attention to the ratio of the leg’s length to its width, and consider how the proportions might change based on the robot’s intended function. For instance, a robot designed for agility might have longer legs in proportion to its body size to facilitate quicker movements.
Adding Details and Textures
Once you have the basic shape and proportions of the robot leg drawn, you can start adding details and textures. This might include panels, vents, bolts, and any movable parts like joints or actuators. Details can make your drawing more interesting and give it a sense of realism. Consider the materials the robot might be made of and how those materials would look in different lighting conditions. Textures can add depth and visual interest to your drawing, making it more engaging for the viewer.
What are the basic components of a robot leg?
+The basic components of a robot leg typically include the main body, joints, and foot. The main body provides structural support, joints allow for movement, and the foot is designed for stability and traction.
How do I determine the proportions of a robot leg?
+Determining the proportions of a robot leg involves considering its intended function and the overall design of the robot. For example, a robot designed for speed might have longer legs in proportion to its body, while a robot meant for heavy lifting might have shorter, thicker legs.
What details should I add to make my robot leg drawing more realistic?
+To make your robot leg drawing more realistic, consider adding details such as panels, vents, bolts, and movable parts like joints or actuators. Additionally, think about the textures and materials the robot might be made of and how those would appear in different lighting conditions.
In conclusion, drawing robot legs is a process that combines technical knowledge with artistic skill. By understanding the basics of robotic anatomy, using simple shapes to sketch the basic form, considering functionality and purpose, paying attention to proportions, and adding details and textures, you can create drawings that are not only visually appealing but also grounded in a deep understanding of robotic design. Whether you’re drawing for fun, for professional purposes, or to explore your creativity, mastering the art of drawing robot legs can be a rewarding and enriching experience.


